|
·It adopts high-quality cast aluminum as the heat sink and has good heat dissipation effect;
·The light source adopts high luminous efficiency and low light decay light source to improve the service life;
·Specially customized lens, soft light, anti-glare design, uniform light distribution;
·Color rendering index CRI>80, color temperature 2700-6000K, to meet the professional competition lighting needs;
·Protection class IP67, resistant to 17 winds, no fear of harsh outdoor environment;
· Independent power supply box design, which is beneficial to heat dissipation of the lamp body, reducing light decay and prolonging the service life of the light source;
·The bracket is equipped with an adjustable angle of 120°, which is more convenient to install on different venues;
Scope of application: basketball stadiums, football fields, tennis courts, golf courses and other large outdoor stadium lighting.
|
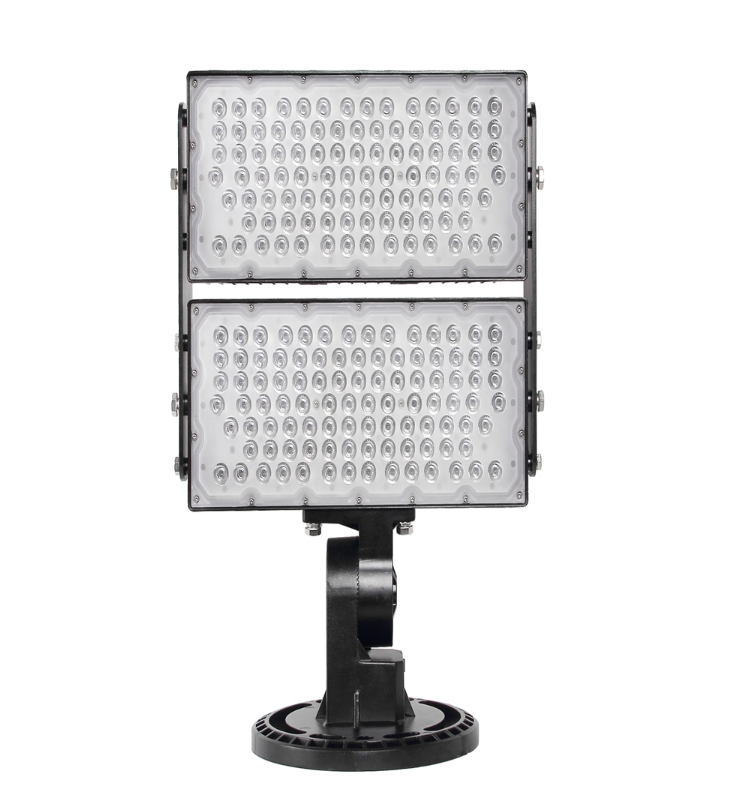
TLR series 600W stadium lights
|
|
Picture
|
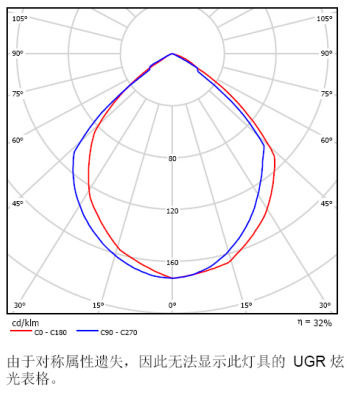
IES light map
|

|

|
|
600 w stadium light
|
Product Model: TLR-600B
|
|
Installation site/method
|
Applicable places
|
Basketball courts, football fields, tennis courts, golf courses and other large outdoor stadiums.
|
|
Installation method
|
Fixing pole
|
|
Lamp parameters
|
Use voltage
|
Using voltage AC100-240V
|
|
power
|
600W
|
|
Power factor
|
≦0.98
|
|
Color temperature
|
2700-6500K (color temperature is used according to different venues)
|
|
Luminous flux (LM)
|
72000±5%
|
|
Illumination angle
|
10°/25°/45°/60° (depending on the installation height and the different illumination angles used by the venue)
|
|
Waterproof rating
|
IP65
|
|
Electrical grade
|
I
|
|
Working temperature
|
-30~50°
|
|
Life
|
50000H
|
|
Lamp size
|
Product size
|
|
Package size
|
|
|
Weight
|
Net weight
|
17KG
|
Gross weight
|
19KG
|
IMPORTANT SAFEGUARDS
When using electrical equipment, basic safety precau ons should
always be followed including the following:
READ AND FOLLOW ALL SAFETY INSTRUCTIONS
1. This product is used in areas with no electrical supply and/or
areas with good climatology. Can be used in a wide range of
places, such as roads, walking paths, parking lots, gardens,
residen al districts, etc.
2. When installing, be sure that the light can perfectly reach to the
panel light and is not blocked by any element such as buildings or
trees.
3. To avoid the possibility of electrical shock, turn o power supply
before install or during maintenance. It must be performed by
qualified personnel.
4. Product must be installed in accordance with your local electrical
code. If you are not familiar with these codes and requirements,
consult a qualified electrician.
5. Do not change the structure or any commponents of the
fixture
to ensure safety.

|
Model No.
|
Power
|
Dimensions
|
Weight
|
|
WS-LED-10
|
10W
|
502*295*65MM
|
5.3kg
|
|
WS-LED-15
|
15W
|
704*295*145mm
|
7.5kg
|
|
WS-LED-20-25
|
20W/25w
|
886*295*145mm
|
10.2kg
|
|
WS-LED-30-40
|
30W/40w
|
1114*295*145mm
|
15kg
|
|
SF-LED-50
|
50W
|
1114*420*145mm
|
18kg
|
|
SF-LED-60
|
60W
|
1114*420*145mm
|
19kg
|
SAVE THIS INSTRUCTIONS FOR FUTURE
REFERENCE INSTALLATION:
STANDARD MOUNTING
(Can be used in 10W/15W/20W)
STEP 1:
socket As shown in Diagram2, connect
the screw (M8*50MM) with nut (M8)
throughthe staple bolt, do not ghten.
STEP 2:
pole As shown in Diagram3, set the lamp
into the nut*¹ screw*² *¹ Nut: M8*² Screw:
M8x50mm body 2 light pole.
STEP 3:
As shown in Diagram4, adjust the body
to the appropriate loca on using No.14
wrench and 6mm Allen wrench with the
torque of body 15NM, then ghten the
crews.
STEP 4:
As shown in Diagram 5, installa on is
completed.
This marking indicates that this product should not be disposed with other household wastes throughout the EU.
To prevent possible harm to the environment or human health from uncontrolled waste disposal, recycle it
responsibly to promote the sustainable reuse of material resources. To return your used device, please use
the return and collec on systems or contact the retailer where the product was purchased. They
can take this product for environmental safe recycling.
STEP 1:
As shown in Diagram6, a er the lamp is
installed on the pole (installa on way
referred to the procedure used in 10w/
15w/20w),
connect the screw (M8*50MM)
with nut (M8)
through brace strut and
fastenings, do not
ghten; connect the
screw (M8*50MM)
with nut (M8) through
suppor ng hoop
component and brace
strut, do not ghten.
STEP 2:
As shown in Diagram7, connect the
screw
(M8*50MM) with nut(M8) through
brace
strut and suppor ng hoop
component, do
not ghten
STEP 3:
As shown in Diagram8, ghten the
screws using No.14 wrench and 6mm
Allen
wrench with the torque of 15NM.
STEP 4:
As shown in Diagram9, installa
on is
completed.
|
